







How to load filter tips into an automatic joint rolling machine
Instead of repositioning a loose filter tip after every roll, seat the tip at one end of a compatible rolling machine’s loading pocket before adding your smoking material. This 2026 guide explains the belt-roller workflow, how cone fillers differ, and how to fix slipping or crushed tips without forcing the mechanism.
- Joint rolling machine filter tips belong inside a compatible belt roller before the paper wraps around them.
- Cone fillers use cones with tips already installed; do not add a loose tip to the filling mechanism.
- Match tip diameter, paper length, and machine instructions before loading.
- Headshop serves adult smoking-accessory shoppers; confirm machine compatibility before choosing papers and tips.
Why this matters
The machine type determines where the tip goes. A belt roller forms a paper around the contents and tip; a cone filler puts material into an existing cone. Treating those mechanisms as interchangeable is the first mistake to avoid.
An uneven mouthpiece is not automatically a machine fault. A tip that uncoils, sits crooked, or leaves an empty space beside the filling changes how the paper wraps. Fix the fit before changing the machine.
If you are still deciding whether a roller suits your routine, read whether a joint roller is worth using. The instructions below apply to compatible belt-style machines, not every product advertised as automatic.
Before you start
- Identify the mechanism and find its instructions. Confirm whether you have an exposed belt roller, an enclosed rolling box, a powered roller, or a cone filler. For powered equipment, disconnect power before placing fingers near moving parts.
- Gather compatible materials. Have the specified rolling paper, a correctly sized tip, prepared smoking material, and a clean working surface. Start with 1 paper and 1 tip per test roll rather than preparing a batch.
- Check the non-obvious limitation: diameter matters too. Paper length alone does not establish compatibility. A rigid tip that is wider than the machine’s supported roll diameter can prevent closure or strain the belt; a cone filler generally uses its cone’s existing tip.
For a 2026 purchase or replacement, read the instructions for the exact model and version. An automatic label does not establish a universal loading method, button sequence, or tip size.
Machine and tip compatibility
Identify your loading system
Use this table to choose the correct workflow before opening a paper booklet. These are mechanism categories, not interchangeable settings.
| Machine type | Best for | Where the tip goes | Advantage | Limitation |
|---|---|---|---|---|
| Belt-style roller | Forming a roll from flat paper | Inside the loading pocket, at one end | Lets you position a separate tip before wrapping | Tip diameter must suit the belt and finished roll |
| Enclosed rolling box | Rolling with a contained belt mechanism | In the belt pocket, following the box instructions | Keeps the loading area inside a housing | Lid action and paper placement depend on the model |
| Automatic cone filler | Filling a compatible pre-rolled cone | Remains inside the cone | Eliminates separate tip placement | Requires the specified cone and loading method |
| Tube injector | Filling compatible preformed tubes | Usually already part of the tube | Uses a preformed wrapper and mouthpiece | Loose-tip belt-roller instructions do not apply |
Do not put a loose tip into a powered filling chamber unless the manufacturer explicitly instructs it. A place that accepts loose material is not necessarily a tip holder.
Choose a compatible tip
The word filter covers different accessories. A rolled paper tip, often called a crutch, supports the mouthpiece and helps keep loose material out of it; it is not equivalent to a filter designed to remove particular smoke components.
| Tip type | Best for | Advantage | Limitation |
|---|---|---|---|
| Roll-your-own paper tip | Adjusting mouthpiece diameter by hand | You can shape it before loading | It can uncoil if loosely formed |
| Pre-rolled paper tip | Repeating a consistent loading setup | Arrives formed | Its fixed diameter must match the machine |
| Rigid reusable tip | Machines explicitly compatible with that tip | Holds its shape | It cannot compress to accommodate a mismatched roller |
For a first setup, use the tip type specified by the machine manufacturer. Do not select a rigid alternative simply because its length appears to fit.
Tip placement and filling
Prepare the loading pocket
- Open the machine using its normal release or loading action. Keep powered mechanisms disconnected while arranging material by hand.
- Inspect the belt or loading pocket for stuck paper, loose debris, folds, or visible damage. Remove debris using the cleaning method allowed by the manufacturer.
- Set the belt into the loading position shown in the instructions. On a belt roller, this creates a trough for the tip and filling.
- Check that the moving parts travel freely without material inside. Stop if the belt binds or the housing does not close normally.
Expected result: You have a clean, accessible loading pocket with no obstruction. The mechanism moves normally before you introduce a tip.
Do not lubricate a belt or apply a household cleaner to solve sticking unless the manufacturer permits it. Residue on the rolling surface can transfer to the paper, and the wrong cleaner can damage machine materials.
Seat the tip
- Form a paper tip into a stable cylinder before placing it in the machine. If the tip has a folded inner section, keep its airflow openings intact rather than flattening them.
- Place the tip lengthwise at one end of the belt pocket. Its long axis should follow the intended finished roll, parallel to the rollers.
- Keep the tip inside the usable rolling area, not perched on the housing or trapped beneath an end plate. Follow any designated tip position shown in the manual.
- Release your fingers briefly. If a paper tip springs open, reshape it outside the machine before continuing.
Expected result: The tip rests straight in the pocket and keeps its shape without being wedged into place. Its outer end aligns with the intended mouthpiece end of the paper.
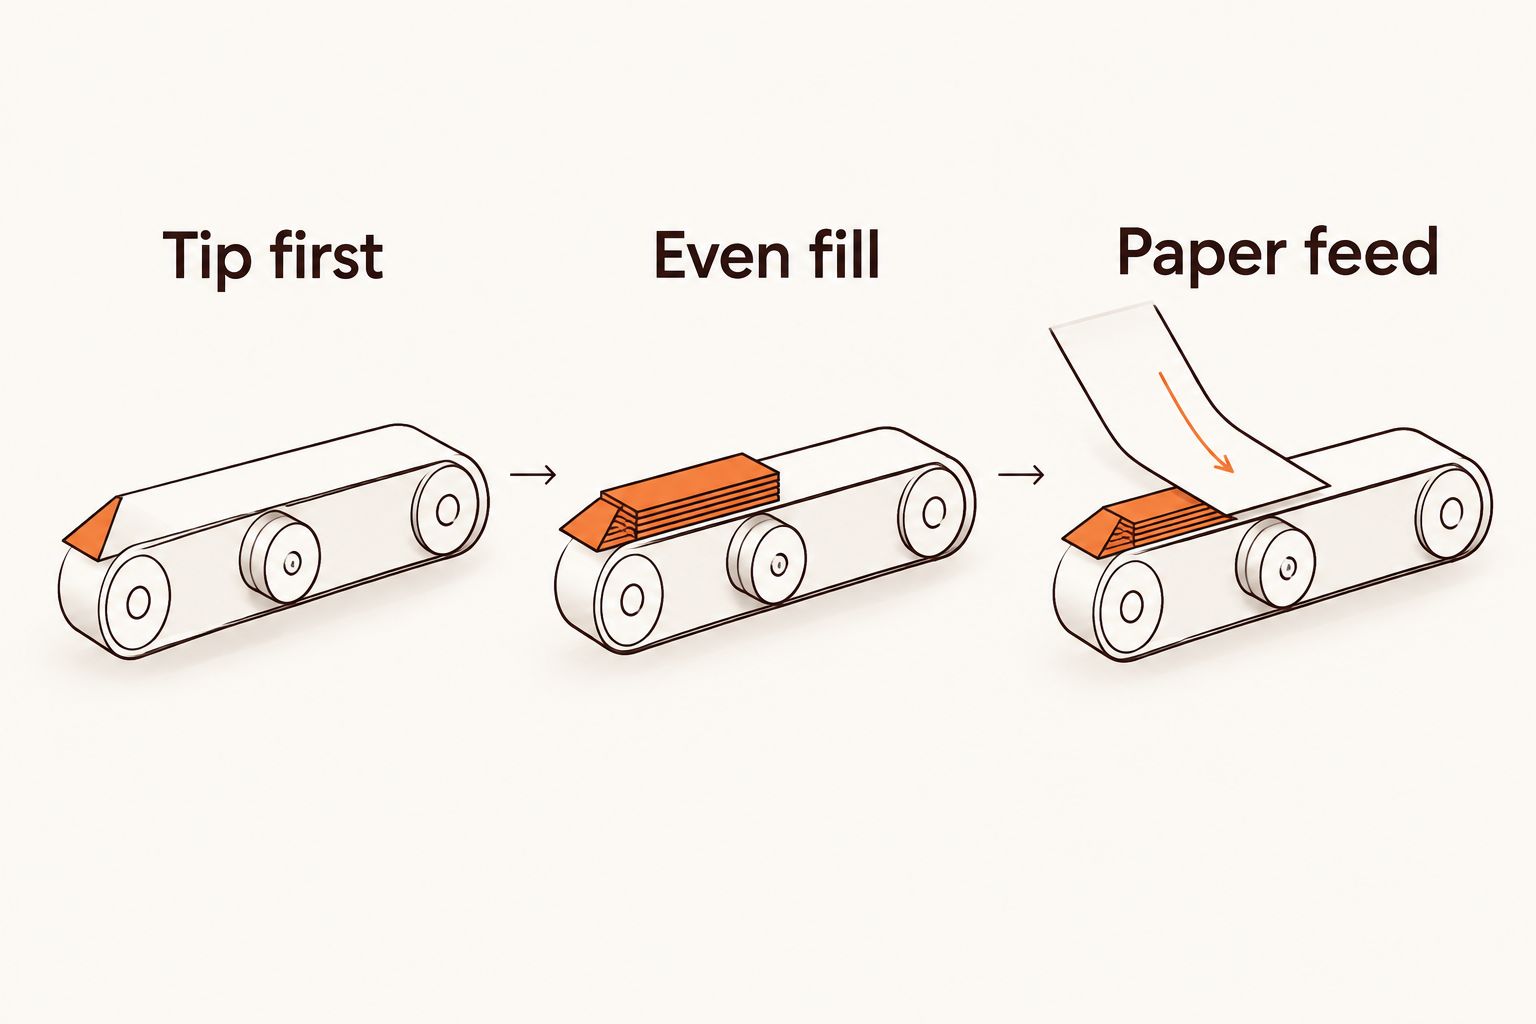
A useful placement sequence is Tip first, Even fill, Paper feed. Each action depends on the previous one: stable tip placement makes it easier to fill the remaining pocket without shifting the mouthpiece.
Add the filling
- Break up clumps and remove hard stems or other pieces that interfere with an even fill. Use material prepared as the machine instructions specify.
- Distribute the filling through the remaining pocket. Keep it beside the tip rather than piled over the mouthpiece.
- Bring the filling into contact with the tip’s inner end without forcing material into the tip. Avoid leaving an obvious empty gap at that junction.
- Level the filling and remove excess from the housing edges. Close or engage the roller only as directed, without pressing through resistance.
Expected result: The tip stays straight, the filling occupies the remaining rolling space evenly, and the machine closes without force.
There is no universal loading weight for joint rolling machine filter tips. The tip occupies part of the paper’s length, while the machine’s diameter and permitted fill determine the remaining capacity. Use the manufacturer’s loading guidance instead of copying a quantity from another roller.
Paper feed and finished-roll checks
Feed and seal the paper
- If the model requires pre-rolling the contents before paper insertion, complete that action in the specified direction. Do not assume all belts turn the same way.
- Position the paper with its adhesive edge and feed orientation exactly as the machine instructions show. Keep the paper square to the rollers rather than feeding a corner first.
- Advance the paper using the prescribed roller, lid, or powered action. Stop if the paper folds, the tip moves out of position, or the mechanism resists.
- Moisten the adhesive edge as directed by the paper instructions, then finish wrapping. Do not soak the paper or belt.
- Remove the finished roll using the normal release. Let the adhesive set before handling the seam repeatedly.
Expected result: The paper wraps around both the filling and tip, the seam stays closed, and the mouthpiece is not crushed or visibly loose.
Check these 3 areas before repeating the setup:
- Mouthpiece: The tip stays seated during gentle handling.
- Junction: There is no obvious hollow neck between the tip and filling.
- Seam: The adhesive edge lies flat without a folded channel.
Make your 2026 setup repeatable by recording the paper format, tip type, and machine setting, if the model provides one. Change only one of those variables when diagnosing a poor result; otherwise, you cannot identify which adjustment helped.
Second workflow: load a cone with its tip already installed
A cone filler does not normally roll flat paper around a loose tip. Use a compatible pre-rolled cone with its mouthpiece already installed, then follow the machine’s filling process.
- Confirm that the cone format matches the filler’s instructions. A cone that fits loosely in the opening is not proof of compatibility.
- Inspect the cone before loading. Replace a cone with a torn wrapper, distorted mouthpiece, or displaced tip rather than attempting to repair it inside the mechanism.
- Seat the cone in the designated holder with the orientation specified by the manufacturer. Do not improvise an adapter from loose paper or insert an extra tip.
- Add the permitted filling material and run the prescribed cycle. Keep fingers and tools outside moving parts.
- Remove the cone and inspect the area immediately above its tip. Follow the manufacturer’s packing instructions rather than driving a tool into the mouthpiece.
Expected result: The cone retains its original tip, the wrapper remains intact, and the filling sits above the mouthpiece rather than inside it.
For 2026 equipment comparisons, distinguish cone compatibility from loose-tip compatibility. A machine that fills cones does not automatically support flat papers, separate tips, or preformed tubes.
Troubleshooting
The tip slips out after rolling
A loose mouthpiece indicates that the wrapper is not holding the tip securely. Check for an undersized tip, an uncoiled paper crutch, or loose wrapping at that end.
Reshape or replace the tip, then repeat the load with the tip straight and the paper aligned. Do not compensate by crushing the entire roll tighter.
The machine crushes the tip or will not close
Stop and reopen the mechanism using the normal release. Check for an oversized tip, excess filling, or a tip caught on the housing.
Never force closure around a rigid tip. Confirm compatibility before trying again, and stop using the machine if its belt or housing shows damage.
A hollow neck forms beside the tip
An empty gap between the tip and filling leaves the wrapper unsupported. Reopen and reload if the machine permits it, distributing the filling up to the tip’s inner end.


Keep the junction filled without stuffing material into the mouthpiece. Adding more filling everywhere does not specifically fix that gap.
The paper wrinkles or feeds diagonally
Remove the damaged paper and check that the next sheet matches the machine’s supported format. Start the feed square, with the adhesive edge positioned as the instructions require.
Also inspect the belt for debris or a folded edge. Repeatedly feeding fresh paper through a dirty or damaged belt does not address the cause.
The powered machine stalls
Stop the cycle and disconnect power before inspecting an accessible loading area. Follow the manufacturer’s jam-clearing procedure; do not push a tool through a moving feed path.
Check for incompatible cones, excess filling, and misplaced loose accessories. Contact the manufacturer if the machine continues to stall after permitted cleaning and reloading.
Customize your workflow
Build consistency around fit, not extra force. Once a setup works, keep the same paper format and tip type while you refine filling distribution.
Headshop sells smoking accessories for adult shoppers, but an accessory category does not establish compatibility with your particular roller. Check the exact machine instructions before changing the mouthpiece material or wrapper format.
For your 2026 rolling setup, separate preparation from operation: form the tip, prepare the filling, then load the machine. Keep spare papers outside the working area so loose sheets cannot enter a powered mechanism accidentally.
A successful test roll is the point to expand your routine. Preparing a batch before confirming fit repeats the same mistake across every paper and tip.
FAQ
Where do filter tips go in an automatic joint rolling machine?
In a compatible belt-style machine, place the tip lengthwise at one end of the loading pocket before adding filling and paper. A cone filler instead uses the tip already installed in its compatible cone.
Do I put the filter tip in before the paper?
Yes, in the belt-roller workflow described here, seat the tip before the paper wraps around it. Follow your exact model’s instructions for filling, pre-rolling, and paper insertion.
Which joint rolling machine filter tips work best?
The best joint rolling machine filter tips match the machine’s specified diameter, usable length, and permitted tip material. Adjustable paper tips help with shaping, while pre-rolled tips provide a fixed shape that still needs a compatibility check.
Can I put a glass tip into an automatic roller?
Use a glass tip only when the machine manufacturer explicitly supports that tip type and size. A rigid tip cannot compress to accommodate a mismatched belt or housing.
Why does my filter tip fall out after rolling?
A tip falls out when the wrapper does not hold it securely. Check tip diameter, whether a paper tip has uncoiled, and whether the machine wrapped the mouthpiece end evenly.
Can I add another filter tip to a pre-rolled cone?
Do not add another tip as part of a cone-filling workflow. Use the compatible cone with its existing mouthpiece and follow the filler’s instructions.
Does a paper crutch make smoking safe?
No, a paper crutch does not make smoking safe. Its structural role is not evidence that it removes harmful smoke components.
Does Headshop provide one loading method for every automatic roller?
No single loading method applies to every automatic roller. Use this Headshop guide to distinguish the mechanisms, then follow the manufacturer’s model-specific loading and safety instructions.
One last thing
The tip is also a fit check. If it sits crooked before you add paper, wrapping will not correct its position. Pause while the loading pocket is still visible, reseat the tip, and remove any filling that pushes it sideways.
Related guides