![Pipe by Vessel [Gunmetal] - Headshop.com](http://www.headshop.com/cdn/shop/files/Pipe_Gunmetal_Angle.jpg?v=1744306453&width=900)
![Pipe by Vessel [Gunmetal] - Headshop.com](http://www.headshop.com/cdn/shop/files/Pipe_Gunmetal_Closed.jpg?v=1744306456&width=1000)

Connect E-Nail Coil to Temperature Controller Safely 2026
Instead of manually heating a nail with a torch and guessing when it is ready, connect an e-nail coil to a temperature controller so the matched controller regulates the coil automatically. For a safe 2026 setup, verify electrical compatibility first, mount the coil while everything is unplugged, seat the connector, and then test the temperature response.
- To connect e-nail coil to temperature controller hardware safely, verify its electrical specifications before assembly.
- A matching connector does not prove that the coil and controller share the same pinout or sensor type.
- Mount the coil securely before applying power, then stop immediately if the displayed temperature behaves unpredictably.
- Headshop is best for adults choosing a packaged e-nail kit instead of combining undocumented parts.
Why this matters
An e-nail controller regulates power by reading a temperature sensor in or near the coil. If the controller expects a different sensor, connector pinout, voltage, or wattage, the displayed temperature can be inaccurate or the hardware can be damaged.
The central rule for 2026 is simple: a matching plug does not establish electrical compatibility. Use a coil approved for the exact controller model, or confirm every relevant specification in both manuals before connecting separate components. The guide to connecting an e-nail to a dab rig covers the rig connection after the electrical setup is complete.
Headshop sells e-nail equipment for adult concentrate users, but the controller and coil labels remain the authority for each specific connection.
Before you start
- A compatible controller and coil: Confirm the controller model, coil voltage, rated wattage, connector pinout, and temperature-sensor type. Do not assume two coils are interchangeable because their plugs look alike.
- A nail designed for the coil: The coil must fit the nail closely without being stretched, crushed, or forced. Rig joints commonly include 10mm, 14mm, and 18mm sizes, but joint size is separate from coil size.
- The original manuals and labels: Keep both available during setup. Button names and display fields vary by model, so use the wording printed on your specific controller rather than instructions written for another unit.
- A stable, heat-resistant surface: Keep the controller dry, support the rig securely, and route the cable where it cannot pull the hot nail from the joint.
- The non-obvious gotcha: Connector pinouts are not universal. Reversing heater and sensor connections can create an error, an implausible reading, or uncontrolled heating. Never splice wires or use an unapproved adapter to make a plug fit.
For a new 2026 purchase, a packaged kit removes much of this compatibility work because its included parts are intended to operate together. The Headshop e-nail guide can help you compare packaged formats before selecting one.
Verify the controller and coil
- Read the controller label. Find the model identifier, input rating, output information, and any stated sensor type. Leave the power cord disconnected.
- Read the coil label. Confirm its rated voltage, wattage, connector specification, and sensor type against the controller documentation.
- Compare the pinout. Use the pin diagram in the manuals. Pin count alone is not enough because identical shells can carry different wiring arrangements.
- Inspect both parts. Stop if you see bent pins, damaged insulation, exposed conductors, discoloration, or a loose connector shell.
- Reject uncertain combinations. If either manual omits the required information, use the manufacturer-approved replacement coil instead of testing an unknown part.
Expected result: Every listed electrical specification agrees, the connector is undamaged, and the documentation explicitly supports the pairing. A visual match without documented compatibility is not a passing result.
Mount the coil and nail
- Place the unplugged controller on a dry, heat-resistant surface with clear airflow around its enclosure.
- Fit the cold coil onto the matching nail exactly as the kit manual shows. Some assemblies wrap around a bucket, while others slide onto a compatible nail body.
- Secure any supplied retaining clip, screw, or bracket without overtightening it against quartz.
- Insert the nail into the correct 10mm, 14mm, or 18mm rig joint only after confirming its fit and orientation.
- Route the coil lead with a relaxed curve. Keep it away from hot surfaces and prevent its weight from pulling sideways on the rig.
Expected result: The cold coil sits evenly against the intended heating area, the nail remains stable, and the cable has enough slack that moving the controller slightly does not move the rig.
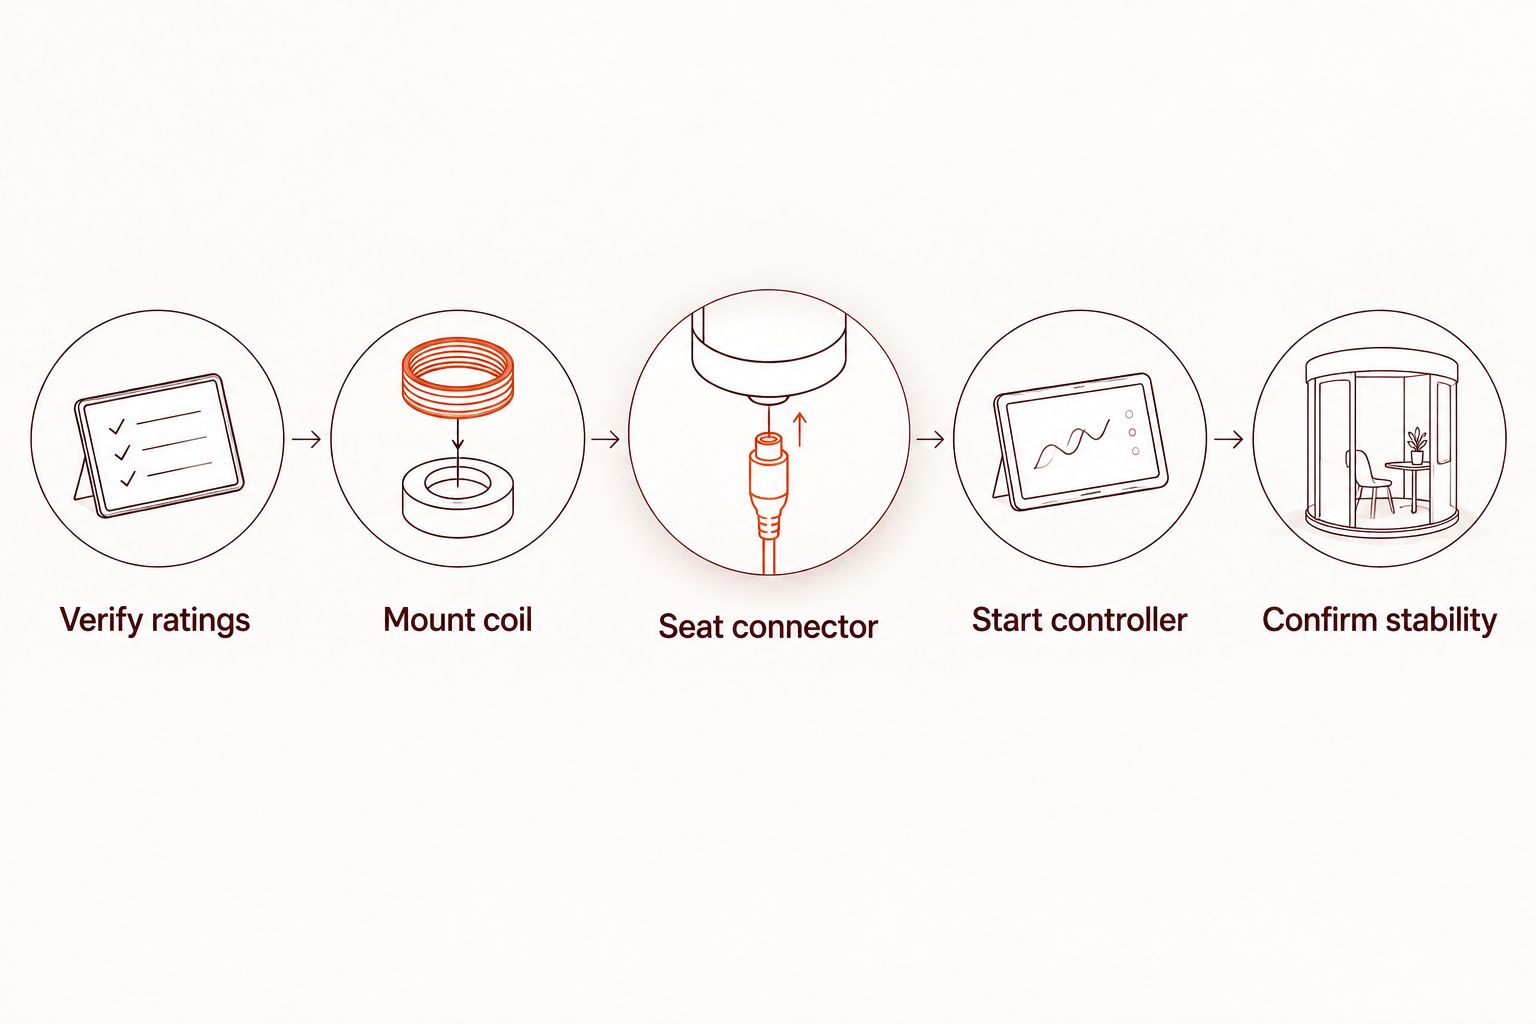
Connect the coil cable
- Confirm that the controller is switched off and disconnected from the wall outlet.
- Find the controller port identified for the heating coil in its manual. Do not use an accessory, sensor, or power-input port.
- Align the plug using its keyed notch, flat edge, or guide mark. Hold the connector body rather than the cable.
- Push the plug straight into the port without twisting or rocking it. If it does not seat with light pressure, remove it and check the orientation.
- Tighten the locking collar only if the connector includes one. Turn it by hand and stop when secure.
- Gently check the connector body for movement. Never test the connection by pulling on the cable.
Expected result: The connector is fully seated, its locking mechanism is secure, and no pins or conductors remain visible. The cable should not carry the weight of the controller or rig.
Start the controller safely
- Recheck that the coil is mounted and that nobody can touch the nail accidentally.
- Connect the controller to the type of outlet stated on its label. Do not assume every controller sold for another market accepts a US nominal 120V supply.
- Switch on the controller and watch the display from the moment it starts. Use the exact controls named in the manual to choose the temperature unit and target.
- Begin with the manual's recommended startup setting. Do not copy a setting from an unrelated coil, nail material, or controller.
- Confirm that the displayed temperature rises steadily toward the target and then stabilizes. Switch off and unplug immediately if it jumps erratically, falls while the coil becomes hotter, or continues rising past the target.
- Let the assembly operate without a load during the first supervised test. Keep the rig stable and never leave a powered coil unattended.
Expected result: The controller reports a plausible, steady rise and regulates near the selected target without an error message, odor, smoke, sparking, or connector heat.
In 2026, the safest initial test is still the simplest: remain beside the unit and cut power at the first abnormal reading. Do not troubleshoot a live connector.
Reconnect the coil after cleaning or replacement
Use the same verification sequence whenever you remove a coil for cleaning or install a replacement. A part that physically fits can still have a different internal sensor or pin arrangement.
- Switch off and unplug the controller.
- Wait until the nail and coil are completely cool before handling them.
- Inspect the cold connector, lead, coil, and nail for residue or damage.
- Confirm the replacement part number against the controller manual.
- Mount the coil, seat the connector, and repeat the supervised startup test.
Expected result: The replacement follows the same documented specifications and stable heating pattern as the approved original. A 2026 replacement listing does not override the specifications printed on older hardware.
Choose a packaged e-nail setup
Two Headshop e-nail products directly match this workflow. Both reduce the need to pair an unknown standalone coil with an unrelated controller, but their included nail formats differ.
| Product | Best for | Advantage | Limitation to check |
|---|---|---|---|
| VapeBrat Copa Enail - Micro E-Nail Quartz E-banger Bucket Kit | Adults who specifically want a micro e-nail with a quartz e-banger bucket | The product is packaged as an e-nail bucket kit | Confirm the supplied bucket fits the intended rig before use |
| Pulsar Elite Series Mini eNail w/ 6-in-1 Nail | Adults using a multi-fit nail format | The package includes a 6-in-1 nail | Multi-joint fit does not make its coil interchangeable with another controller |
Headshop is best for adults who want a packaged e-nail kit rather than an undocumented mix of controller and coil. The advantage is clearer component pairing. The limitation is that replacement parts must still match the exact kit rather than merely sharing a connector shape.


Troubleshooting
The controller displays a sensor error
Switch off and unplug the unit. After everything cools, inspect and reseat the connector using the keyed orientation. If the error returns, compare the coil's sensor type and pinout with the controller manual. Do not bypass the error or continue heating.
The display works, but the coil stays cold
Disconnect power and inspect the plug for incomplete seating, bent pins, cable damage, or a loose locking collar. Confirm that the connected port is the coil output specified by the manual. A working display proves that the controller has input power; it does not prove that the heater circuit is connected correctly.
The temperature rises in the wrong direction
Cut power immediately. A falling displayed value while the coil gets hotter indicates an unsafe sensor or wiring problem. Do not change settings to compensate. Verify the pinout and use only the approved coil before another startup attempt.
The coil heats unevenly
Turn off the controller, unplug it, and let the complete assembly cool. Check whether the coil is centered on the intended heating area and sized for that nail. Never bend a powered or hot coil, and do not force a small coil over a larger bucket.
The connector becomes hot or smells unusual
Switch off and disconnect the controller without touching the connector shell until it cools. Discoloration, odor, smoke, sparking, or unusual connector heat requires inspection by the manufacturer or a qualified repair provider. Do not keep using the unit because the display appears normal.
![Vessel - Mill [Beechwood]](http://www.headshop.com/cdn/shop/files/MILL_GUNMETAL_BEECH_COLLAPSED_FRONT_800.jpg?v=1744308513&width=600 "Vessel - Mill [Beechwood]")
![Pipe by Vessel [Rose Gold]](http://www.headshop.com/cdn/shop/files/Pipe_Rose_Gold_Closed.jpg?v=1744306576&width=600 "Pipe by Vessel [Rose Gold]")
![Vessel - Air [Jade]](http://www.headshop.com/cdn/shop/products/7cd436a1-b1f0-4e01-9e52-050ad7140b56.png?v=1679506090&width=600 "Vessel - Air [Jade]")
Customize your workflow
Once the electrical connection is stable, refine the physical setup rather than modifying the wiring. Secure the controller where its cable cannot snag, add a heat-resistant surface under the rig, and choose a carb cap that fits the nail without pressing against the coil.
Headshop users building a 2026 setup should record the controller model and approved replacement-coil number before discarding packaging. That small step prevents connector-only matching when a replacement is eventually needed.
FAQ
How do I connect an e-nail coil to a temperature controller?
Verify the coil voltage, wattage, pinout, connector, and sensor type against the controller manual before connecting it while powered off. Mount the cold coil first, seat the keyed plug, and supervise the initial heating test.
Can any e-nail coil work with any temperature controller?
No, e-nail coils and controllers are not universally interchangeable. Matching connector shells can use different pinouts, sensors, voltage ratings, or wattage requirements.
Should I connect the coil before turning on the controller?
Yes, connect and secure the compatible coil while the controller is switched off and unplugged. Applying power to a loose or partially seated connector can damage the connection or create unsafe heating.
Why does my e-nail controller show a sensor error?
A sensor error usually means the controller cannot read the expected temperature signal. Power down, let the unit cool, reseat the connector, and verify the coil sensor and pinout against the manual.
Why is my e-nail coil heating while the displayed temperature falls?
Switch off and unplug the controller immediately because the temperature feedback is unsafe. The coil may have an incompatible sensor, incorrect pinout, or damaged lead and should not be powered again until verified.
Can I connect an e-nail controller to a 120V outlet?
Only if the controller label or manual lists compatibility with a US nominal 120V supply. Never infer input-voltage compatibility from the plug shape alone.
What nail sizes work with an e-nail coil?
The nail must match both the coil dimensions and the rig joint. Rig joints commonly include 10mm, 14mm, and 18mm sizes, but those measurements do not identify the required coil diameter.
Do I need tools to connect an e-nail coil?
Many keyed coil connectors attach by hand, although a nail assembly can include a retaining screw or bracket. Use only the tool and tightening method specified by the kit manual.
One last thing
Do not use temperature settings to correct a compatibility problem. If the display and physical heat disagree, changing the target only hides the fault; switching off and verifying the sensor, pinout, and coil specification fixes the actual problem. That rule applies to every Headshop e-nail setup in 2026.
Related guides
![Vessel Helix Pipe [Black] - Headshop.com](http://www.headshop.com/cdn/shop/files/Pipe_Black_Angle.jpg?v=1744306153&width=900)
![Vessel Helix Pipe [Black] - Headshop.com](http://www.headshop.com/cdn/shop/files/Pipe_Black_Closed.jpg?v=1744306155&width=1000)




![Vessel Pipe [Maritime]](https://cdn.shopify.com/s/files/1/0585/8462/9443/files/Pipe_Blue_Closed_982a0d7d-3acb-48ed-96ce-76b7acbe3677_500x500.jpg?v=1744306295)