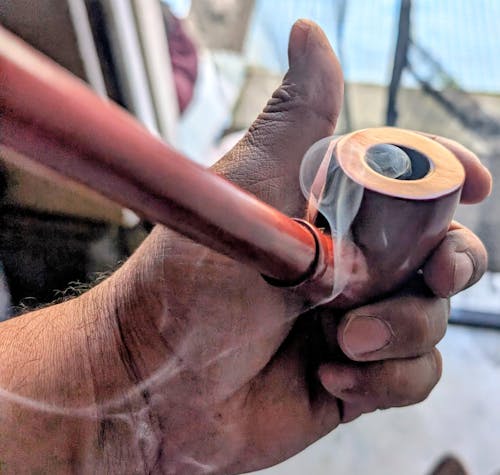
How to Make a Sherlock Holmes Pipe: A Step-by-Step Guide to Crafting Your Own Classic Smoking Accessory

Making a Sherlock Holmes pipe can seem tricky, but it's easier than you think. This classic smoking accessory has a timeless design loved by many. This guide will show you how to make a Sherlock Holmes pipe step-by-step, using simple tools and materials.
Get ready to craft something truly unique!
Materials Needed for Crafting a Sherlock Holmes Pipe
You’ll need the right wood, tools, and finishing materials to start. Each piece plays a key role in shaping your pipe’s look and feel.
Choosing the Right Wood: Briar vs. Cherrywood
Crafting a Sherlock Holmes pipe begins with selecting the ideal wood. Briar and cherrywood are two popular choices, each offering unique traits that affect the smoking experience, durability, and aesthetics.
| Wood Type | Key Features | Smoking Experience |
|---|---|---|
| Briar Wood |
|
|
| Cherrywood |
|
|
Briar wood remains a top choice for its performance and longevity. Cherrywood, though less common, provides a distinctive style with a flavor that some enjoy. Each option gives crafters flexibility to match their personal preferences.
Tools Required: Carving Tools, Sandpaper, and Drill
Making a Sherlock Holmes pipe needs the right tools. Each tool plays an important role in the process.
- Carving Tools: These help shape the wood into the classic pipe design. Choose sharp tools for smooth and precise cuts.
- Sandpaper: This smooths rough edges and finishes the surface of the pipe. Use different grits, starting with coarse and ending with fine.
- Drill: A drill is necessary to create both the tobacco chamber and airway. Use a bit that matches your design for accurate holes.
- Pipe Stem Fitting Tool: This ensures the stem fits snugly onto the bowl. Precision here helps with functionality.
- Protective Gear: Always wear safety goggles while carving or drilling to protect your eyes from debris.
Properly using these tools can help make a functional, beautiful smoking accessory!
Additional Materials: Pipe Stem, Finish, and Varnish
Crafting a Sherlock Holmes pipe needs a few extra materials. These items make the pipe functional and polished for use.
- Pipe Stem: A stem connects to the bowl where tobacco burns. Choose one made of sturdy material like acrylic or vulcanite for durability and comfort.
- Finish: Finish helps protect the wood and adds a smooth texture. It also enhances the natural grain of briar or cherrywood.
- Varnish: A clear varnish gives shine and seals the wood surface. It makes the pipe resistant to wear from heat and moisture.
- Adhesive: Glue may secure the stem to the bowl tightly without gaps.
- Cleaner Tools: Include pipe cleaners to maintain airflow after assembly and regular use.
These extras create a long-lasting, stylish, and usable smoking accessory!
Designing Your Pipe
Pick a style that speaks to you—classic bent or straight. Sketch your design on the wood as your guide.
Determining the Shape: Classic Bent or Straight Style
The shape of a smoking pipe matters for both style and use. A classic bent style curves downward, giving it an old-school, chill vibe. It also feels lighter since the curve helps balance the weight during a smoke session.
The straight style keeps things sleek and simple, offering a more modern look with direct airflow.
Both designs are popular among cannabis users because they change the overall experience. Some prefer the relaxed feel of the bent shape, while others like how easy it is to clean a straight one.
As Headshop.com shows, picking between these shapes depends on personal taste and habits.
A good pipe is all about finding your flow—be it bent or straight.
Sketching the Design on the Wood
Start with a clean piece of wood. Use a pencil to outline your pipe’s shape on the surface. Choose between bent or straight styles for classic vibes. A good sketch helps guide carving and ensures balance in design.
This step allows for full customization and creativity. Think about aesthetics, functionality, and how it feels in the hand. Accurate sketches prevent mistakes later while bringing your vision to life.
Carving the Pipe Bowl
Start shaping the wood with care to form the pipe bowl. Use your tools steadily—smooth, controlled cuts make all the difference.
Shaping the Bowl Exterior
Shaping the bowl exterior is exciting and creative. This step gives the pipe its unique look and feel.
- Choose a block of wood like briar or cherrywood. These are durable and perfect for smoking pipes.
- Use a pencil to draw your design on the wood surface. A classic bent or straight style works great for Sherlock pipes.
- Start carving with small, sharp tools to shape the outside of the bowl. Remove excess wood carefully to avoid mistakes.
- Smooth out rough edges using medium-grit sandpaper. This helps refine the shape and prepares it for finishing touches later.
- Check your progress often to ensure symmetry in the bowl's curves and lines. Balance is key to achieving that classic Sherlock look!
Drilling the Tobacco Chamber
Shaping the bowl is just the first step. Drilling the tobacco chamber gives your pipe its function and character.
- Choose the right drill bit for this step, usually between 3/4 inch to 7/8 inch wide. It depends on how large you want the chamber.
- Mark the spot where you plan to drill using a pencil or marker for accuracy. This helps guide your drilling process.
- Secure the wooden block firmly in a vise or clamp to prevent movement while drilling.
- Drill slowly into the marked spot with steady pressure until you've reached the desired depth for holding tobacco.
- Avoid going too deep, as this might weaken the bottom of the bowl and ruin airflow.
- Stop frequently to clear out wood dust, allowing you to check progress and alignment.
- Test-fit some loose tobacco or herbs inside once done to ensure proper size and space.
Always take time during this step for precision, as it can affect how well your pipe works later!
Creating the Airway
Drill a straight hole from the bowl to the stem area for airflow. Keep it centered for smooth smoking later.
Drilling the Stem Hole
Drilling the stem hole is a key step in crafting a Sherlock Holmes pipe. It ensures smooth airflow, which improves the smoking experience.
- Use a drill bit that matches the diameter of your pipe stem. This helps create a snug fit for proper airflow.
- Start by marking the drilling point on your wood piece. Make sure it aligns with the tobacco chamber for an even draw.
- Drill slowly and carefully to avoid splitting the wood. A steady hand ensures precision while preventing damage.
- Stop periodically to check alignment. Poor alignment can ruin airflow and make the pipe hard to use later.
- Clean out any debris from the drilled hole once done. This clears blockages and keeps air moving freely through the airway.
This step connects directly to shaping and fitting the pipe stem next.
Ensuring Proper Airflow Alignment
Ensuring proper airflow is key to crafting a functional Sherlock Holmes pipe. Good air circulation helps the smoke flow smoothly, making it more enjoyable.
- Choose the right drill bit size for the stem hole and tobacco chamber. A wrong size can block airflow.
- Align the airway between the bowl and stem carefully. Any misalignment will disrupt ventilation.
- Check for clogs or debris in the drilled holes. Clear them out to optimize air distribution.
- Test airflow by blowing gently through the stem after drilling is complete. Weak airflow means further adjustments are needed.
- Sand inside the airway if rough edges exist from drilling. Smooth walls help maintain indoor air quality during use.
- Avoid creating sharp bends in the airway path while shaping your pipe design. Straight paths improve pressure balance.
- Fit and test all parts before final assembly to ensure full thermal comfort for a smooth smoking experience.
- Apply a light finish inside to seal off any cracks that could affect filtration or airflow alignment over time.
- Re-test everything after polishing to confirm proper function before using your new pipe!
Crafting the Pipe Stem
Shaping the stem is where creativity meets precision. Make sure it fits snugly with the bowl for a smooth smoking experience.
Shaping and Fitting the Stem
Making the stem is key to finishing your tobacco pipe. It connects the bowl and ensures smooth airflow.
- Trace the stem shape on your material before cutting. Use a clear design to avoid mistakes.
- Cut the stem piece using a saw or carving tools for precision. Aim for clean lines.
- Sand down rough edges to create a smooth surface on the stem. This step helps with comfort during smoking.
- Drill through the stem to make an airway passage, matching it with the bowl hole size. Ensure alignment for good airflow.
- Test fit the stem onto the bowl carefully without force. The connection should feel snug but not overly tight.
- Shape the mouthpiece end of the stem for easy use, keeping comfort in mind.
- Fine-tune fitting by sanding areas that seem uneven or don’t fit well.
- Finish it with varnish or stain to seal and protect, giving it a classic handcrafted touch.
Attaching the Stem to the Bowl
Connecting the stem to the bowl is a crucial step in making your pipe functional. It ensures smooth airflow and creates a sturdy connection for smoking.
- Drill a hole into the side of the bowl where the stem will fit. Make sure it aligns with the tobacco chamber for proper airflow.
- Use sandpaper to smooth out any rough edges around the drilled area on the bowl. This prevents damage to the stem when inserted.
- Shape the end of the pipe stem using a file or sandpaper so it fits snugly into the drilled hole on the bowl. Check for tightness but avoid forcing it in too hard.
- Apply glue or epoxy sparingly inside the hole before inserting the stem to secure it firmly in place. Wipe off excess adhesive immediately to keep it neat.
- Once attached, test for any blockages in airflow by blowing through both ends of your pipe gently before proceeding further.
Finishing Touches
Smooth out every edge and make it feel good in your hands. Add the final shine to give it that classic, polished look.
Sanding and Smoothing the Pipe
Sanding and smoothing are key steps in making a Sherlock Holmes pipe. These steps enhance the look and feel of the pipe while improving its usability.
- Use coarse sandpaper first to shape the pipe surface. This removes rough edges and uneven spots on the wood.
- Switch to finer sandpaper to smooth out scratches left by the coarse paper. Gradually use finer grits for a silky finish.
- Sand in small circles across the wood for even results. This technique prevents uneven patches or grooves on your pipe.
- Check your progress often as you sand to avoid removing too much material. Keep the design and shape intact during this process.
- Wipe off dust during sanding using a clean cloth or brush. A clean surface makes it easier to see imperfections that need more work.
- Finish sanding with ultra-fine sandpaper to create a polished feel on the wood’s surface. This step helps prepare it for staining or varnishing later.
- Feel the surface with your hands after sanding is complete. It should be perfectly smooth with no rough areas remaining, enhancing both style and comfort.
- Apply any stain, varnish, or finish after completing all sanding steps. A polished finish adds shine and protects the wood from wear over time.
- Let the final coating dry completely before using or testing the pipe. This step ensures durability without damaging all your hard work.
10.Test airflow once finished to confirm proper functionality after smoothing, ensuring great smoking experiences every time!
Applying Stain or Varnish
Adding stain or varnish gives your pipe a smooth and polished look. It also protects the wood, making it durable for long-term use.
- Clean the surface of the pipe with a soft cloth to remove any dust or debris. A clean surface ensures even application.
- Use fine-grit sandpaper to prepare the wood for staining or varnishing. This step helps seal the wood and highlights its natural grain.
- Select a quality wood stain that enhances the grain and provides rich color depth. Briarwood, for example, takes on stain beautifully, revealing intricate patterns in the grain.
- Apply a light coat of stain with a small brush or rag along the grain's direction. Allow the stain to dry completely before adding more coats if needed.
- Choose a clear varnish to add protection and shine to your pipe's surface. Look for one that enhances durability while providing aesthetic appeal.
- Apply thin layers of varnish using a clean brush to avoid streaks or uneven spots.
- Let each layer dry fully before applying another coat for better durability and gloss finish.
- Once dry, lightly buff the surface with polishing cloths until it feels smooth and shines brightly.
These steps leave your pipe looking sleek and ready for use, leading into crafting its final design finish!
Polishing for a Classic Look
After applying stain or varnish, the pipe needs a final touch. Polishing gives it that timeless and elegant finish.
- Use fine-grit sandpaper to smooth out any rough spots left after staining. Rub gently to avoid damaging the wood.
- Take a soft cloth and apply a small amount of finishing wax or polish onto it. Spread it evenly across the pipe's surface.
- Buff the pipe using circular motions to bring out a natural shine and enhance its patina.
- Inspect the detailing carefully as you polish, making sure no areas are missed or overdone for an even look.
- Avoid pressing too hard on the aged wood, which might remove the stain or cause scratches.
- Repeat polishing in layers if needed, especially for deep sheen and vintage aesthetics.
- Let it rest for a few hours to let the finish settle properly before use.
Polishing transforms your crafted piece into a graceful accessory that screams craftsmanship and elegance!
Tips for First-Time Pipe Makers
Start with simple designs, take your time carving, and focus on getting the airflow just right—small tweaks can make a big difference!
Common Mistakes to Avoid
Making your first Sherlock Holmes pipe can be fun, but mistakes happen. Avoid these common errors to ensure a smooth process:
- Using the wrong type of wood ruins the pipe. Briar and cherrywood are best for their heat resistance.
- Skipping proper sketches leads to uneven shapes. Drawing the design prevents unnecessary carving errors.
- Drilling crooked holes disrupts airflow. Aligning the tobacco chamber and stem hole is essential for even smoking.
- Over-sanding damages the wood's surface. Light sanding ensures smoothness without thinning the pipe too much.
- Applying excessive varnish causes sticky finishes. A thin, even coat gives a polished yet natural look.
- Fitting an improper stem creates poor connections. Measuring both parts carefully avoids loose or tight fits.
- Rushing the carving leads to cracks in the wood. Steady hands produce better results with less waste.
- Ignoring test-smoking can cause issues later on. Smoking from your finished pipe reveals flaws early.
Testing Your Finished Pipe
Light a small amount of tobacco or herbs in the bowl. Take slow, steady draws to check airflow and ensure smooth smoking. If it feels blocked, clean the airway and remove any debris with a pipe cleaner.
Inspect for cracks or loose fittings after testing. Make sure the stem fits snugly into the bowl without wobbling. Check that heat doesn’t transfer too much to your hands while using it.
This step ensures comfort and quality before moving forward with exploring styles of Sherlock pipes!
Explore Different Styles of Sherlock Pipes
Sherlock pipes come in many unique styles. Some are handcrafted from wood, while others use glass or ceramic materials. Each material offers a different smoking experience. Glass pipes often look colorful and sleek.
Ceramic ones feel sturdy and smooth to hold. On sites like Headshop.com, you can find these options easily.
Classic designs with curved stems stand out as timeless favorites. For those wanting something custom, there are plenty of pipe designs to match different tastes. High-quality craftsmanship ensures durable and stylish pieces for any smoker’s collection.
Choosing the right design makes every smoke session special!
Conclusion
Making a Sherlock Holmes pipe is both fun and rewarding. It brings together creativity, patience, and skill. By following the steps, anyone can craft a pipe with classic charm. With care and effort, this handmade accessory becomes something to enjoy or display for years to come.
FAQs
1. What materials do I need to make a Sherlock Holmes pipe?
You will need wood for the bowl, such as briar or cherry, a stem made of vulcanite or acrylic, sandpaper for shaping and smoothing, a drill for creating holes, and finishing products like wax or polish.
2. How do I shape the bowl of the pipe?
Start by sketching your design on the wood block. Use carving tools to remove excess material and sandpaper to refine its shape into the classic curved style associated with Sherlock Holmes pipes.
3. Is making a Sherlock Holmes pipe difficult for beginners?
It can be challenging but manageable if you follow clear steps. Patience is key when carving and shaping; start simple before trying intricate designs.
4. Can I use any type of wood to craft my pipe?
No, not all woods are safe for smoking accessories. Briar is ideal because it resists heat well and improves durability while adding character to your finished piece.




![Vessel Helix Pipe [Copper] - Headshop.com](http://www.headshop.com/cdn/shop/files/ad3c0443-b76d-4fe5-84b8-a617dd50a950.jpg?v=1747419387&width=900)
![Vessel Helix Pipe [Copper] - Headshop.com](http://www.headshop.com/cdn/shop/files/7b0e06e3-9106-4684-80e4-408362c34085.jpg?v=1747419388&width=1000)
![Vessel Wood Vape Pen Battery [White/Beechwood] + - Headshop.com](http://www.headshop.com/cdn/shop/files/4ecd5d0f-363a-454e-a7a0-229fb93bf456.jpg?v=1725470645&width=900)
![Vessel Wood Vape Pen Battery [White/Beechwood] + - Headshop.com](http://www.headshop.com/cdn/shop/files/d232e493-09e6-4574-b44c-3e2bde9425b4.jpg?v=1725470647&width=1000)


![Vessel Compass Apex Charger [Black] - Headshop.com](http://www.headshop.com/cdn/shop/files/f10e6bf4-6ce7-4a59-a50e-a4184f069754.jpg?v=1729115238&width=900)
![Vessel Compass Apex Charger [Black] - Headshop.com](http://www.headshop.com/cdn/shop/files/dce98c70-346c-405f-aca8-d59c7feed96d.jpg?v=1729115240&width=1000)

![Vessel Helix Pipe [Black] Vessel Helix Pipe [Black]](http://www.headshop.com/cdn/shop/files/Pipe_Black_Angle.jpg?v=1744306153&width=600)
![Vessel Pipe [Maritime] Vessel Pipe [Maritime]](http://www.headshop.com/cdn/shop/files/Pipe_Blue_Closed_982a0d7d-3acb-48ed-96ce-76b7acbe3677.jpg?v=1744306295&width=600)
![Vessel Element Hand Bubbler [Black] Vessel Element Hand Bubbler [Black]](http://www.headshop.com/cdn/shop/files/Element-Product-Listing-Images2.jpg?v=1744306952&width=600)
![Vessel Pipe [Emerald] Vessel Pipe [Emerald]](http://www.headshop.com/cdn/shop/files/231c9f1f-11ba-4db3-aa3d-29b786d02e7f.jpg?v=1744745505&width=600)
![Vessel Pipe [Maritime] - Headshop.com](http://www.headshop.com/cdn/shop/files/Pipe_Blue_Closed_982a0d7d-3acb-48ed-96ce-76b7acbe3677.jpg?v=1744306295&width=900)
![Vessel Pipe [Maritime] - Headshop.com](http://www.headshop.com/cdn/shop/files/Pipe_Blue_Open_d28f56b9-f5af-45fe-9636-ae8f20aec6f3.jpg?v=1744306297&width=1000)
![Vessel Pipe [Emerald] - Headshop.com](http://www.headshop.com/cdn/shop/files/231c9f1f-11ba-4db3-aa3d-29b786d02e7f.jpg?v=1744745505&width=900)
![Vessel Compass Rise [Obsidian] - Headshop.com](http://www.headshop.com/cdn/shop/files/631009c0-e68c-4238-9a63-73f14dd1117f.jpg?v=1717545548&width=900)
![Vessel Compass Rise [Obsidian] - Headshop.com](http://www.headshop.com/cdn/shop/files/a12c8ff4-4bee-4dc9-b697-542f6130e46e.jpg?v=1717609092&width=1000)






![Pipe by Vessel [Gunmetal]](https://cdn.shopify.com/s/files/1/0585/8462/9443/files/Pipe_Gunmetal_Angle_500x500.jpg?v=1744306453)


