

How to connect a dart to your e-nail for low-temp dabs
Instead of repeatedly adjusting a loose attachment, verify what your dart actually connects to, then assemble the approved parts with the e-nail unplugged. A dart e-nail connection is not a universal fitting: a loading tool stays separate, while a dedicated attachment requires documented compatibility.
- Headshop sells dab rigs and smoking accessories; confirm dart e-nail connection compatibility before choosing an attachment.
- A handheld loading dart does not plug into an e-nail controller or heater coil.
- Match the controller, coil, nail, and attachment separately; a matching plug does not establish electrical compatibility.
- Use the manufacturer's temperature instructions; the controller reading does not automatically equal the contact-surface temperature.
Why this matters
The word dart alone does not identify a connector, material, or approved installation method. Before attaching anything, determine whether you have a handheld loading tool, a removable insert, or a component intended for a particular heating system.
That distinction changes the entire setup. A loading tool transfers material and comes back out; an approved insert follows its own seating instructions; an electrical component must match the controller's requirements.
Headshop is best for adult shoppers looking for dab rigs and smoking accessories. For this setup, start with compatibility rather than a product name or a connector that looks close. The e-nail coil and temperature controller connection guide covers that separate electrical connection.
For your 2026 setup, keep the exact model numbers and current manufacturer instructions together. Do not substitute a guide for a similar-looking device.
Before you start
- Identify every component. Gather the dart's packaging or instructions, controller model, heater-coil model, nail or banger specifications, and rig joint details. If the dart has no identifiable model or intended use, stop before attaching it.
- Prepare a cold, dry workspace. Unplug the controller, let previously used hardware cool completely, and place the rig on a stable, heat-resistant surface. Inspect glass, cables, connectors, and retaining hardware before assembly.
- Check the hidden compatibility issue. A plug that fits is not proof of compatible wiring. Obtain manufacturer confirmation for the controller-and-coil pairing; do not test an unknown combination by switching it on.
You also need a safe place for the loading tool or removable accessory after use. Do not plan to rest it on a hot coil, cable, controller enclosure, or the edge of the rig.
Dart identification and compatibility
Identify the dart's function
- Read the packaging and locate the exact model designation. Identify whether the manufacturer describes the item as a loading tool, insert, cap component, or electrical attachment.
- Inspect the intended connection without forcing anything together. Look for the attachment point described in the instructions, not merely a surface where the item appears to fit.
- Separate mechanical compatibility from electrical compatibility. A tool resting against a nail has no reason to enter the controller socket; an electrical attachment needs explicit controller approval.
- Check the stated material and heat-contact instructions. Do not assume that a handle, coating, adhesive, or decorative section can touch a heated surface.
Expected result: You can explain what the dart does, where it belongs, and whether it remains installed during heating. If any answer depends on guesswork, the setup is not ready.
A useful 2026 compatibility record includes the model name, intended attachment point, approved mating component, and the instruction document you checked. Keep that record with the equipment rather than relying on a remembered product photo.
Separate the connection types
| Component type | Best for | Connection approach | Advantage | Limitation |
|---|---|---|---|---|
| Handheld loading dart | Transferring material without a permanent attachment | Keep separate from the controller and coil | Requires no electrical pairing | Heat-contact limits still depend on its construction |
| Dedicated removable insert | A heating surface explicitly designed for that insert | Seat only as its manufacturer directs | Provides a defined mechanical arrangement when approved | Dimensions alone do not establish suitability |
| Dedicated electrical attachment | A controller explicitly approved for that component | Use the documented connector and wiring combination | Operates as part of its intended heating system | Similar-looking connectors are not interchangeable by default |
These are identification categories, not a claim that your dart supports each workflow. Choose the row that matches the manufacturer's description, not the result you want the accessory to produce.
Cold hardware assembly
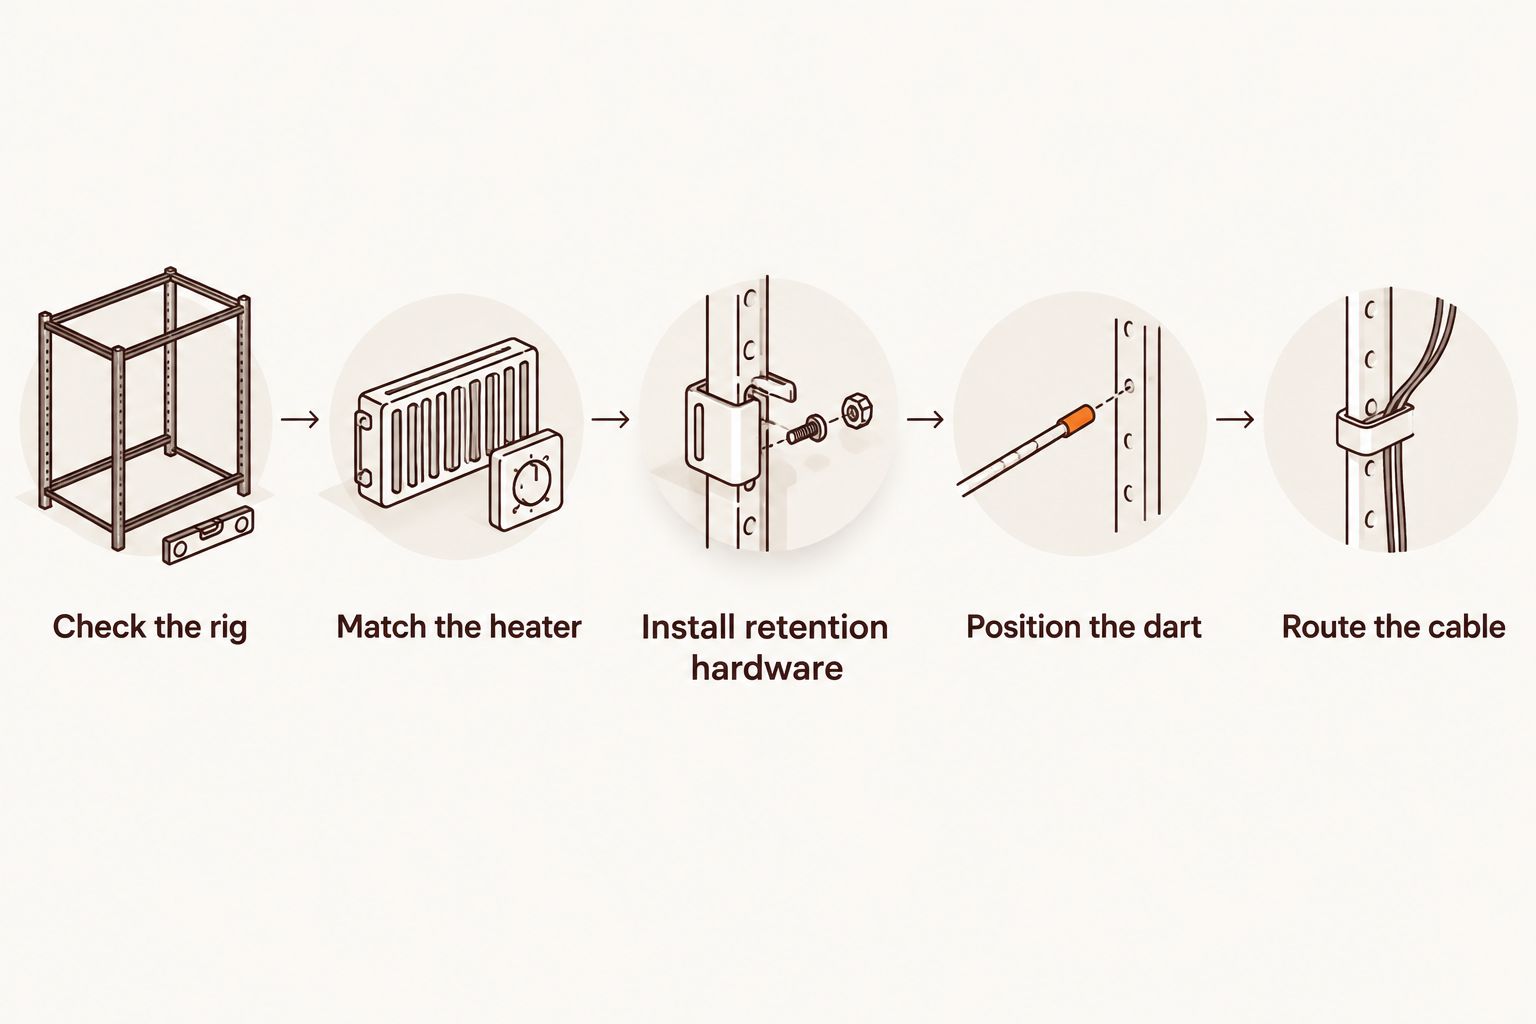
- Check the rig joint. Confirm the joint size, connection type, and angle against the nail or banger specifications. Seat compatible glass gently; do not twist a mismatched part into place.
- Match the heater geometry. Confirm the approved coil size and shape for the nail. A side-wrapping coil and a heater designed to support a bucket are not substitutes merely because their diameters look similar.
- Install the approved retention hardware. Follow the nail-and-coil instructions for clips, supports, or retainers. Do not improvise with wire, tape, or pressure against the glass.
- Position the dart appropriately. Leave a loading tool separate. Install a dedicated attachment only at the documented attachment point and only at the assembly temperature specified by its manufacturer.
- Route the cable. Leave enough slack to avoid pulling the rig, and keep the cable clear of the heated assembly and wet areas.
Expected result: The cold assembly sits securely without a strained joint, stretched cable, or improvised support. The dart either has a documented seat or remains a separate tool.
Read dimensions by their purpose
A measurement is useful only when you know which interface it describes. Joint size, coil size, and dish diameter refer to different parts of the assembly.
For example, the supplied specifications for the Titanium 6 in 1 Original Enail Dab Nail list a 20mm coil size and 10mm, 14mm, and 18mm joints. Those joint sizes do not describe a dart connection. They also do not establish which controller can power a particular coil.
The Titanium 6 in 1 Hybrid Dab Nail lists a 22.5mm quartz dish. That dimension describes the dish, not an approved electrical connector or a universal insert fitting.
For a 2026 replacement purchase, match each dimension to its named interface. Never use the largest or most prominent number in a listing as a shortcut for complete compatibility.
Controller connection and temperature verification
- Confirm the controller is unplugged and the heater is cold. Check that the approved coil connector is clean, dry, and undamaged.
- Align and secure the connector exactly as the controller manual directs. Do not force the plug, modify its pins, or use an unapproved adapter.
- Confirm the required supply information from the device label and manual. Keep the controller and its connections away from water.
- Power on using the manufacturer's instructions. Use the documented control sequence rather than copying button presses from a different controller.
- Select the manufacturer's recommended starting setting for the approved nail-and-coil combination. Confirm whether the display reports a setpoint, a sensor reading, or another operating value.
- Observe the assembly during its initial heating cycle. Stop if the controller reports an error, the heater shifts, the cable becomes damaged, or an unexpected electrical odor appears.
Expected result: The approved heater operates without an error, the assembly remains secure, and you understand what the displayed temperature represents.
There is no single temperature recommendation that applies to every dart, nail material, coil geometry, and sensor location. Do not treat a controller setpoint as a verified contact-surface temperature. Use a suitable measurement method and follow its instructions if you need to check the surface independently.
Your 2026 setup notes should distinguish the controller setting from any separately measured surface reading. Record the measurement location as well; a reading taken elsewhere does not establish the temperature at the contact point.
A second workflow: using a loading dart without attaching it
If your dart is a handheld loading tool, the correct workflow does not include a permanent dart e-nail connection. The controller powers its approved heater; the dart remains separate.
- Assemble and verify the e-nail without the loading tool installed.
- Keep the dart on a separate heat-resistant rest, away from the coil and cable.
- Use the tool only for the contact and handling tasks permitted by its manufacturer.
- Remove the tool after its intended task. Do not leave an unapproved tool resting in the heated assembly.
- Shut down the heater according to its instructions, and let components cool before disassembly or cleaning.
Expected result: The loading tool does its job without becoming an unsupported part of the heater assembly. This avoids confusing material transfer with electrical or mechanical installation.
The benefit is simple separation between the tool and the heating system. The limitation is equally clear: a loading dart does not add temperature sensing, controller compatibility, or a secure insert seat.
Hardware options: what the product name does not prove
Headshop's e-nail-related products include complete-device listings and individual nail listings. Choose by the component you need to replace, then verify the remaining interfaces. Neither listing below establishes dart compatibility.
| Product | Best for | Stated configuration | Useful distinction | Limitation |
|---|---|---|---|---|
| Pulsar Elite Series Mini eNail w/ 6-in-1 Nail | Shoppers researching an e-nail listed with a nail | Mini eNail with a 6-in-1 nail | The listing identifies both the device category and nail | The supplied information does not establish dart compatibility or controller controls |
| Titanium 6 in 1 Original Enail Dab Nail | Shoppers checking an individual nail against existing hardware | 20mm coil size; 10mm, 14mm, and 18mm joints | Separates coil sizing from rig joint sizing | A nail listing does not establish controller-and-coil electrical compatibility |
Check the full manufacturer specifications before making either selection. A complete-device title is not a wiring diagram, and a multi-joint nail is not a universal accessory adapter.


Troubleshooting
- The dart has nowhere to connect. Recheck its intended function. A handheld loading tool does not need a controller socket or permanent seat; do not create one with an adapter.
- The connector fits, but the controller reports an error. Switch off, unplug, and stop testing. Verify the exact controller-and-coil pairing with the manufacturer rather than reseating an unknown combination repeatedly.
- The coil or nail moves during setup. Let everything cool completely. Recheck heater geometry, approved retention hardware, cable tension, and the rig's stability before restarting.
- The display looks stable, but surface readings differ. Confirm what the display measures and follow the independent measuring device's instructions. Do not alter calibration or advanced controller parameters without manufacturer guidance.
- The dart sticks or does not seat freely. Stop applying force. Let the assembly cool, inspect for residue or damage, and check the specified fit; do not pry against glass or enlarge the attachment point.
Customize your workflow
Once compatibility is settled, improve the parts you can verify: cable routing, a dedicated tool rest, accessible shutdown controls, and a written component list. These changes simplify repeat setup without modifying the heater.
Check the cap separately from the dart. A cap's seating and airflow requirements belong to the banger-and-cap combination; the carb cap and quartz banger connection guide addresses that interface.
For your 2026 maintenance record, note any replaced coil, nail, or attachment. Recheck compatibility after a hardware change instead of assuming the previous arrangement still applies.
FAQ
How do I connect a dart to an e-nail?
First identify the dart's intended function. A handheld loading tool stays separate; a dedicated attachment connects only where its manufacturer specifies, using an explicitly compatible heating system.
Does a dart plug into the e-nail controller?
A handheld loading dart does not plug into an e-nail controller. Only an electrical component approved for that exact controller belongs in its heater connection.
Can I use any heater coil if the plug fits?
No. A matching connector does not establish compatible wiring or electrical requirements; verify the exact controller-and-coil pairing before applying power.
What temperature should I use for a dart e-nail connection?
Use the manufacturer's instructions for the approved assembly, not a universal dart temperature. The controller setpoint does not automatically establish the contact-surface temperature.
Does a 20mm coil size tell me which dart fits?
No. A 20mm coil specification describes a heater interface, not a dart fitting; accessory compatibility requires its own dimensions and manufacturer approval.
Can I attach or remove the dart while the e-nail is hot?
Do not install or remove a dedicated attachment while hot unless its manufacturer explicitly instructs that procedure. Keep handheld loading tools separate and follow their heat-contact limits.
Why does my e-nail show an error after connection?
An error requires checking the controller's documented error instructions and the approved heater pairing. Switch off and unplug before inspection; do not bypass the error or experiment with unknown coils.
One last thing
The most useful compatibility question is not whether the dart fits—it is what the dart is designed to do. Establish that first, and you eliminate the wrong connection workflow before powering anything on. A tool, an insert, and an electrical attachment are different components, even when their names sound interchangeable.
Related guides