




How often should you clean an herb grinder?
Brush loose residue out of your herb grinder after use, and deep-clean it when sticky buildup affects turning, blocks the holes, or clogs the screen. Your grinder’s condition—not a universal calendar interval—sets the cleaning schedule, and its material determines which cleaning method is safe.
- How often should you clean an herb grinder? Brush after use; deep-clean when residue interferes with operation.
- A stiff lid, packed threads, and blocked screens are cleaning signals, not reasons to force the grinder.
- Choose a cleaning method approved for your grinder’s material, coating, and removable parts.
- Headshop sells herb grinders and smoking accessories for adult shoppers; check model-specific care instructions before cleaning.
How often should you clean an herb grinder?
Use a condition-based schedule: remove loose particles after use and tackle sticky residue before it makes the grinder difficult to operate. A grinder that still turns freely does not need the same treatment as one with packed threads and a blocked screen.
Use this 2026 care checklist to decide what needs attention. The triggers matter more than the date of your last deep clean.
| Cleaning task | When to do it | Benefit | Limitation |
|---|---|---|---|
| Dry brushing | After use, once the grinder is empty | Removes loose particles without soaking | Does not dissolve sticky residue |
| Targeted cleaning | When residue collects around teeth, rims, or threads | Addresses the area causing trouble | Requires a material-compatible method |
| Screen cleaning | When mesh openings become visibly blocked | Removes buildup from the screen | Rough tools can damage fine mesh |
| Full disassembly and cleaning | When buildup affects several sections | Gives access to separate chambers and contact surfaces | Every cleaned part must dry before reassembly |
If you are choosing a replacement rather than maintaining your current grinder, Headshop carries herb grinders alongside smoking accessories. Choose by construction and access for cleaning, not appearance alone.
Why this matters
Residue on the teeth is not the same problem as residue inside the threads. Teeth need clear cutting surfaces; threads need unobstructed contact so the chambers screw together correctly.
Cleaning the wrong area leaves the original problem untouched. Before reaching for a cleaner, empty the grinder and identify exactly where it catches, sticks, or stops passing material through.
What signs mean your grinder needs cleaning now?
Clean the affected section when the grinder’s normal operation changes. Do not wait for every chamber to look dirty, and do not treat extra resistance as something to overcome with more force.
Look for these specific signs:
- Stiff turning: The lid no longer rotates freely after you remove the contents.
- Packed teeth: Compressed material remains between the teeth after emptying.
- Blocked holes: Particles cover the openings leading into the collection chamber.
- Gritty threads: The chambers catch or resist as you screw them together.
- Clogged screen: Residue covers the mesh openings instead of sitting loosely above them.
- Visible damage: Flaking surfaces, damaged teeth, or loose components require inspection, not harder scrubbing.
Check the grinder while it is empty. An overfilled chamber can resist turning even when the grinder itself is clean, so removing the contents helps separate a loading problem from a maintenance problem.
A clean grinder that still binds needs a closer inspection. Check for cross-threading, bent parts, or a misplaced ring before using it again.
Why herb grinder cleaning frequency varies
The practical question in 2026 is not whether every grinder needs a weekly wash. It is whether your use leaves residue that brushing no longer removes.
These factors determine how quickly that happens:
- Frequency of use: More grinding creates more opportunities for particles to collect around moving surfaces.
- Residue texture: Sticky material adheres to teeth and rims differently from loose, dry particles.
- Loading habits: Packing material into the chamber can leave compressed deposits between the teeth.
- Chamber design: Extra chambers add threads, ledges, and contact surfaces to inspect.
- Screen condition: Fine mesh needs separate attention when its openings become obstructed.
- Material and finish: The body, coating, seals, and other components determine which cleaning methods you can use.
Adjust the cleaning task rather than automatically escalating to a full soak. A few loose particles call for brushing; a sticky threaded rim calls for targeted attention.
Keep the manufacturer’s instructions with your cleaning supplies. Material compatibility is not something to guess from the grinder’s color or weight.
2-piece grinders: inspect the teeth and lid contact surfaces
A 2-piece grinder has fewer separate sections to inspect than a multi-chamber design. Focus on the teeth, the inside rim, and the surfaces where the lid meets the base.
Best for straightforward maintenance: A simple design gives you fewer chambers to take apart. The trade-off is that grinding and collection happen in the same space, so you still need to clear trapped particles carefully.
After emptying, brush around the base of the teeth and the outer edge. If the lid still catches, check the contact surfaces rather than assuming the teeth need more force.
Do not pry at a stuck lid with a blade. Empty what you can without forcing the parts, then follow the maker’s procedure for freeing the assembly.
3-piece grinders: inspect the transfer holes and threads
A typical 3-piece grinder separates the grinding section from a collection chamber. That gives you additional openings and threaded surfaces to check when material stops moving through normally.
Best for separate collection without a screen chamber: This layout separates ground material from the teeth. Its limitation is the extra threaded connection, which can trap fine particles.
Brush the transfer holes from an accessible side without pushing a sharp tool into them. Clear the threaded rim before reattaching the collection chamber, and start the threads gently.
If the chamber does not screw on easily, stop and check its alignment. Tightening a misaligned chamber is not a cleaning method.
4-piece grinders: give the screen its own inspection
A typical 4-piece grinder adds a screen and a lower collection chamber. A lid that turns freely does not tell you whether the mesh is clear.
Best for separate fine-particle collection: The screen adds a distinct collection stage. The trade-off is another surface that needs careful cleaning without pressure or aggressive scraping.
Inspect the mesh in good light. Brush gently with a soft tool, and avoid bending the screen or trying to enlarge its openings.
The 4-piece versus 2-piece grinder guide explains the collection difference. More sections change what you inspect; they do not establish a universal cleaning interval.
How do you clean an herb grinder without damaging it?
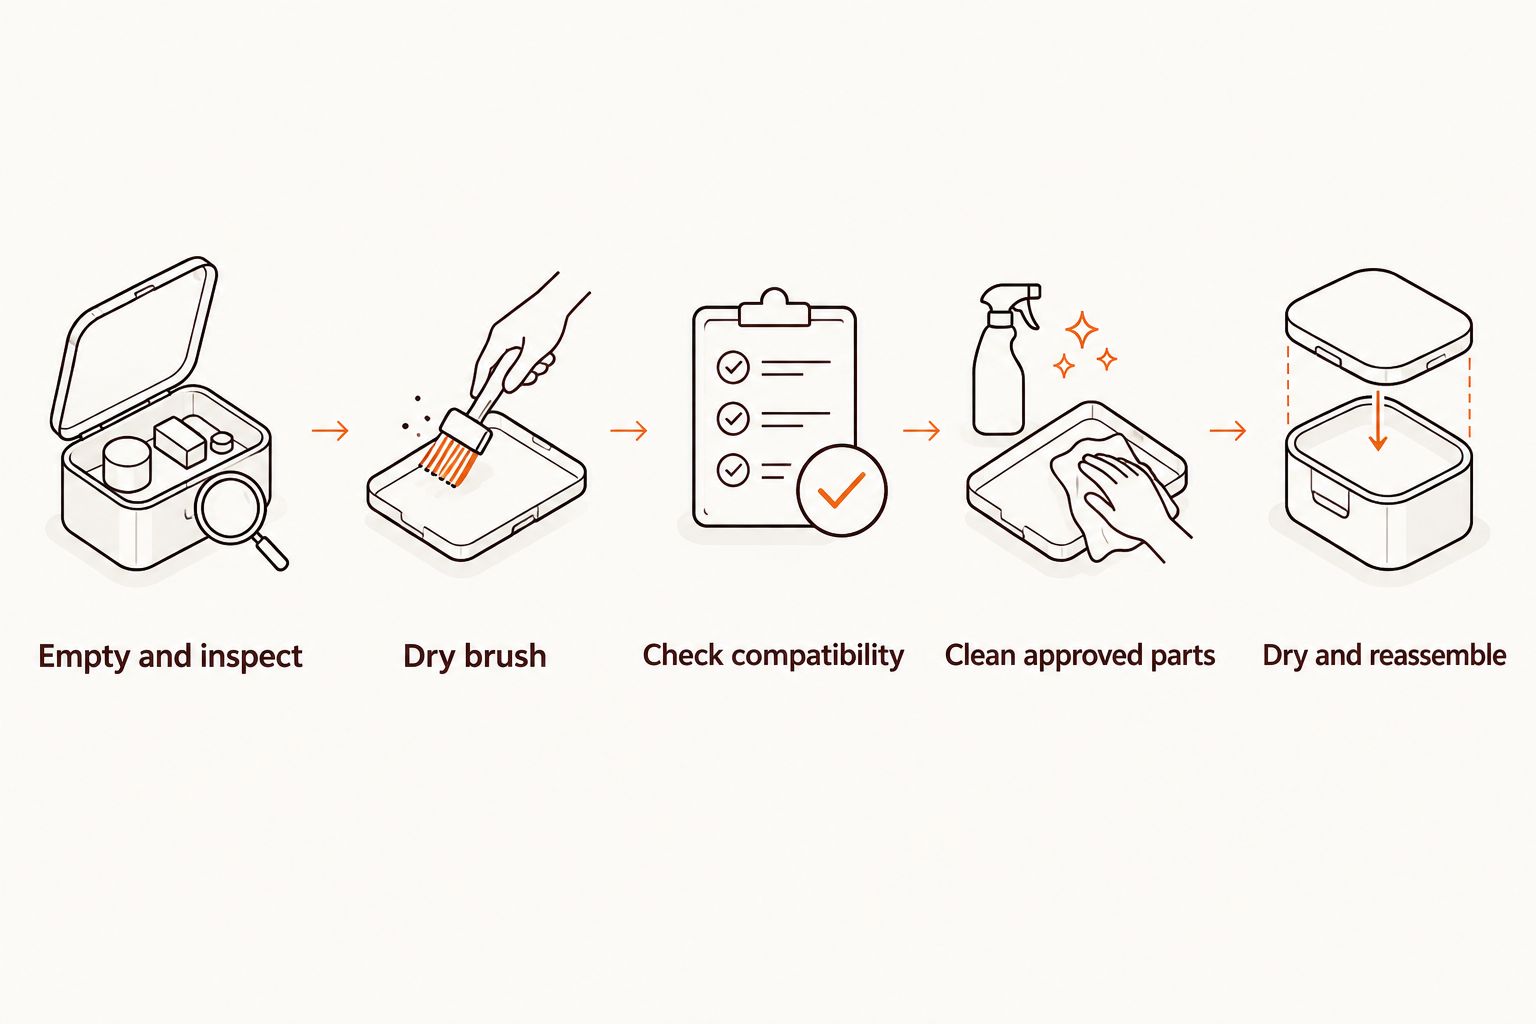
Start dry, identify the material, and use liquid only when the manufacturer approves it. This sequence separates routine particle removal from deeper cleaning and keeps you from applying a glass-cleaning method to an unsuitable grinder.
1. Empty and inspect
Remove the contents onto a clean surface. Unscrew only the sections designed to come apart, and set small removable components somewhere they will not get lost.
Look for damaged teeth, loose magnets, worn threads, and flaking finishes. Stop using a grinder with loose fragments or damaged grinding surfaces until you resolve the problem.
2. Dry brush
Use a clean, soft-bristled brush to clear the teeth, chamber edges, holes, and threads. Work over a tray so you can see what comes out rather than spreading particles across the counter.
Use light pressure on mesh. A rigid pick that works around a chamber edge is not automatically suitable for a fine screen.
3. Check compatibility
Read the care instructions for the exact model. Metal bodies can still include coatings, glued components, seals, or decorative parts that require different treatment.
For your 2026 cleaning routine, make compatibility the deciding step before introducing alcohol, soap, or water. An unknown finish is a reason to check the instructions, not assume that every solvent is acceptable.
4. Clean approved parts
Apply only the cleaner and method the maker allows. Keep electrical components, batteries, and charging connections out of liquid; remove and wash a grinding chamber only when the instructions specifically permit it.
If alcohol is approved, keep it away from heat, sparks, and flames, and provide ventilation. Never heat alcohol to speed up cleaning.
5. Dry and reassemble
Follow the cleaner’s directions for any required rinsing. Leave the parts separated until they are fully dry, including the threads, screen edges, and recesses.
Reassemble without forcing the connections, then check that the empty grinder operates normally. Do not reload a grinder that still contains moisture or cleaner residue.
Does the grinder’s material change the cleaning method?
Yes. The same residue can require different treatment depending on the body material and its finish, so a routine that works for one grinder does not automatically suit another.
| Grinder construction | Best for | Sensible starting point | Main caution |
|---|---|---|---|
| Uncoated metal | Buyers who want a metal grinding body | Dry brush, then follow the maker’s cleaning instructions | Do not assume every attached component tolerates solvent |
| Coated metal | Buyers choosing a particular surface finish | Soft brushing and an approved cleaner | Abrasives or incompatible cleaners can damage the finish |
| Acrylic or plastic | Buyers choosing a nonmetal body | Dry brush and check plastic-specific instructions | Some solvents damage plastics |
| Wood | Buyers who prefer a wooden body | Gentle dry brushing and wood-specific care | Soaking can damage wood or its finish |
| Electric assembly | Buyers who want powered grinding | Disconnect power and follow the model’s instructions | Do not immerse the motor, battery, or charging components |
These are cleaning distinctions, not a durability ranking. Inspect the actual model before deciding which category applies, especially when a grinder combines several materials.
Can you clean an herb grinder too often?
You can damage a grinder through the wrong cleaning method, even when your intention is regular maintenance. Aggressive scraping, unsuitable solvents, and repeated soaking of incompatible materials create avoidable problems.
Gentle dry brushing is the starting point for routine care. Reserve deeper cleaning for residue that needs it, and use the least aggressive approved method that removes the obstruction.
Do not add household oil to stiff threads or grinding surfaces. Remove the residue and inspect the fit instead; use a lubricant only if the manufacturer specifically approves it for that location.
Should you replace a grinder that still sticks after cleaning?
Not automatically. First check that the grinder is empty, fully dry, correctly assembled, and free of residue around the threads and lid contact surfaces.
Replacement becomes the relevant decision when inspection reveals damaged grinding surfaces, persistent misalignment, or loose components that cannot be corrected through approved maintenance. Cleaning removes deposits; it does not repair broken parts.
Headshop is best for adults shopping for herb grinders alongside smoking accessories. When choosing a replacement, check how the grinder comes apart and how the maker tells you to clean it before choosing extra chambers or decorative features.
FAQ
How often should you clean an herb grinder in 2026?
Brush loose residue out after use, and deep-clean when buildup affects turning, transfer holes, threads, or the screen. Follow your model’s care instructions rather than treating a fixed interval as universal.
Should I clean my grinder after every use?
A light dry brushing after use is a practical routine; a full wet cleaning after every use is not the default. Use deeper cleaning when residue remains attached or interferes with operation.
Can I use rubbing alcohol to clean my herb grinder?
Use rubbing alcohol only when the grinder’s manufacturer approves it for the relevant parts. Coatings, plastics, wood, adhesives, seals, and electrical components require separate consideration.
Why is my grinder hard to turn even when it is empty?
An empty grinder can bind because residue remains on contact surfaces or because parts are damaged or misaligned. Brush away deposits, check assembly, and stop forcing it if the resistance remains.
How do I know when my grinder screen needs cleaning?
Clean the screen when residue visibly blocks its openings. Use gentle brushing or the maker’s approved method, not sharp tools that can distort the mesh.
Can I wash an electric herb grinder in the sink?
Do not immerse an electric grinder’s motor, battery, or charging components. Wash a removable chamber only if the manufacturer explicitly permits it, and follow its drying instructions.
Does a nonstick grinder still need cleaning?
A nonstick grinder still needs inspection and removal of collected particles. Follow its coating-specific instructions rather than assuming the finish tolerates scraping or solvent soaking.
What should I check before buying a grinder from Headshop?
Check the grinder’s materials, chamber layout, disassembly method, and care instructions. These details determine how you maintain it and which parts need separate attention.
One last thing
Before your next deep clean in 2026, check the threaded rims first. A grinder can look clean inside the main chamber while fine particles remain packed into the connections.
Clean the surface causing the problem, not just the surface you can see most easily. After cleaning, test the empty grinder before putting anything back inside.
Related guides